Showing posts with label Main Course. Show all posts

Sunday, September 23, 2012

Poppy Seed Chicken

Now that school's back in full swing and the ensuing craziness of schedules has begun, I love having meals on the menu that are simple.  But sometimes simple tastes simple.  But this easy dish is not one of those.  The sour cream, plain yogurt, and cream of chicken create a delicious base for the chicken but the extra wow is the crushed Ritz and poppyseeds.  I think I may even double the Ritz the next time I make it as it adds a nice saltiness to it.  

You cook this in a 9x13 pan and then serve over rice.  I'll write the recipe as written and then give my tips of how I make it a little healhier.  

Poppy Seed Chicken from Michelle S.

4 chicken breasts
1 small container of plain yogurt (about 8 oz)
1/2 bag Ritz crackers (approx 15 crackers)
1 can Cream of Chicken soup
1/2 cube of butter
pepper
salt
poppy seeds

Boil chicken with 3-4 chicken bouillon cubes.  Cube chicken and put in a 9x13 casserole dish.  Mix soup, yogurt, and sour cream together and season well with salt and pepper.  Add a little milk to make it thinner if desired (I always do).  Pour over chicken.  Crush Ritz crackers and mix with 1/2 cube butter (1/4 C). Put on top of soup mixture.  Sprinkle generously with poppy seeds.  Heat 30-40 minutes.   Serve over rice.  

Tips:  Save the chicken stock after cooking the chicken and then use that in place of water when cooking the rice. I use plain greek yogurt.  I also reduce the butter to 1/4 a cube of butter.  I think I may try using the whole package of Ritz crackers next time as we loved the flavor when  you got a bite of it.  

Friday, July 27, 2012

Barbecue Turkey Burgers

Looking for something new to throw on the barbecue? Here's a nice, lighter twist on a hamburger.  The ground turkey is combined with some flavorful spices like garlic powder, chili powder, and salt. It all pairs really well with the BBQ sauce spread on the bun that the recipe calls for.  My kiddos all gobbled this up--even my baby (well....not so baby at 18 months).  Sometimes I have a hard time eating a "healthy" version of something when you're comparing it to the original.  But that's what makes this recipe so great with the use of bbq sauce over ketchup as the condiment.  It was a unique, flavorful, yummy version of a hamburger.  

Barbecue Turkey Burgers from "The Best of Cooking Light: Everyday Favorites" 

1/4 C chopped onion
1/4 C barbecue sauce, divided
2 T dry breadcrumbs
2 tsp prepared mustard
3/4 tsp chili powder
1/2 tsp garlic powder
1/4 tsp salt
1 lb ground turkey
Cooking spray

1. Combine onion, 2 T bbq sauce, breadcrumbs, and next 5 ingredients in a medium bowl.  Divide turkey mixture into 4 equal portions (I did 6).  Shape into hamburger patties.
2. Heat a grill pan (or barbecue) over medium-high heat.  Coat pan with cooking spray.  Place patties in pan; cook 7 minutes on each side or until done.
3. Place 1 lettuce leave, 1 tomato slice, and 1 patty on bottom half of hamburger bun.  Spread each patty with 1 1/2 teaspoon barbecue sauce.  Cover with top halves of bun. 

Wednesday, July 25, 2012

Crockpot Chicken Tacos

These are seriously so FANTASTIC!  My friend brought these over to share during a lunch date.  I could not get over the flavor!  So I had to immediately make them for my family.  The chicken is tender and moist as it's been sitting in the crockpot slow-cooking all day long.  And the salsa combined with the brown sugar is just the perfect amount of sweet to offset the tang of the salsa.  I took these to my parents to share on Monday and they agreed that they were amazingly delicious.  This will definitely be a staple on our menu!   I think they taste best paired with the uncooked tortillas (like you get at Costco) that you cook at home.  And the black beans are an amazingly compliment to the flavor of the meat.  Oh, and did I mention how easy it is??? You know that gets extra marks at our house!

Don't mind that crazy black bean that escaped just as I was taking the photo
Crockpot Chicken Tacos from Fantastic Family Favorites 


3 lbs. frozen chicken breasts
1 24oz jar salsa
2 cups brown sugar

1. Place the frozen chicken breasts into the slow cooker. Pour half the jar of salsa over the chicken. Sprinkle 1 cup brown sugar on top. Cover and cook on high for 6 hours.
2. Remove the chicken from the slow cooker and discard the liquid. Shred chicken and place back in slow cooker.
3. Cover chicken with remaining salsa and brown sugar. Cook on low 1 hour, then stir the chicken to coat the meat. Cook on low for 1 more hour.

Top with your favorite taco toppings--cheese, lettuce, tomatoes, black beans, etc.

Tips:  When my friend made hers she just used equal parts salsa and brown sugar on hers.  She didn't do the draining part and adding more salsa and brown sugar.  I, however, followed this recipe without draining it.  The meat seemed dry after I shred it so I added more brown sugar and salsa.  However, it was a little too juicy (dripping all over your hands) when eating the taco.  So.....the moral is---follow it exactly or just cook in 1 C salsa and 1 C brown sugar , shred, and return to former juices.  Are you thoroughly confused??? If so, leave me a comment :).

Monday, July 2, 2012

Overnight French Toast Bake

Are you looking for something yummy and easy to make for your family breakfast on the 4th this week?  This just might be what you're looking for.  I saw this recipe on Pinterest (again trying to conquer trying all those things on my "recipes to try" board) and knew I had to try it.  I loved how the description said "love french toast but hate standing and flipping bread and never getting to sit down with your family".....Umm...yes.  They read my mind, in fact.   So we tried this for Father's Day this year.  My husband gushed about how delicious it was.  He even compared it to Kneaders french toast (quite a compliment as those of you in the West might know).   And I loved that it only took a few minutes the night before and then I popped in the fridge overnight and simply put it in the oven to bake in the morning.  Now that's my kind of fancy breakfast.   

Next time around I think I'll definitely cut the crusts off the bread as they got a teeny bit hard after sitting for a few minutes after being served.  I also loved the texas toast with it but might venture out and get a loaf of cinnamon bread next time and cut it nice and thick.  But if you make it as written you won't be disappointed.

Overnight French Toast Bake from Rach's Blog

Ingredient Checklist
1/2 cup melted butter (1 stick)
1 cup brown sugar
1 loaf Texas toast
4 eggs
1 1/2 cup milk
1 teaspoon vanilla
Powdered sugar for sprinkling

Directions
1. Melt butter in microwave & add brown sugar....stir till mixed.
2. Pour butter/sugar mix into bottom of 9 x 13 pan....spread evenly to cover bottom of pan
3. Beat eggs, milk, & vanilla and add 1 T powdered sugar to egg mixture
4. Lay single layer of Texas Toast in pan
5. Spoon 1/2 of egg mixture on bread layer.  Sprinkle sugar and cinnamon on bread before next layer
6. Add 2nd layer of Texas Toast
7. Spoon on remaining egg mixture.  Spread a thin layer of butter on bread.  Sprinkle with white sugar and cinnamon.  
8. Cover & chill in fridge overnight
9. Bake uncovered at 350 for 45 minutes
10. Sprinkle with powdered sugar
11. Serve with warm maple syrup (I don't do the syrup part)

Tips:  The brown sugar and butter carmelizes at the bottom of the pan so serve bottomside up.  I also overbaked it a bit (because it hadn't specified covered or not and I realized it needed to be uncovered halfway through) and that part became hard after sitting out--so just don't overbake.  

Wednesday, May 16, 2012

Baked Crunchy Ranch Chicken

I don't know about you--but the end of the school year always feels a little harried at our house.  So if you're looking for an amazingly simple recipe to throw together on one of those nights--look no further.  The breading of crushed corn flakes create a nice crunch while the parmesan and dry ranch dressing mixed with it create a punch of flavor.  The recipe calls for the chicken to be dipped in butter but I decided to go for a healthier variety and dipped it in egg whites this time.  I really noticed no difference--so try it either way.  I also like to use chicken tenders instead of chicken breasts as I think it makes the chicken more moist and tender.  Sometimes chicken breasts tend to dry out, in my opinion.  

Baked Crunchy Ranch Chicken adapted from Allrecipes

2 C crushed cornflakes
1 C grated Parmesan cheese
1 (1oz) pkg ranch salad dressing mix
8 skinless, boneless chicken breast halves (or 12 boneless/skinless tenders)
1/2 C butter, melted (or 3 egg whites)

In a shallow bowl, combined the cornflakes, Parmesan cheese and salad dressing mix.  Dip chicken in butter (or egg whites), then roll in cornflake mixture to coat.  Place in a greased 9x13 baking dish.  Bake, uncovered, at 350 for 45 minutes or until chicken juices run clear. 

Tips:  We couldn't decide if the whole ranch packet was a little too much flavor--so I may try using 1/2-3/4 of the pkg next time.

Serves size: 1 tender (or 2 oz)

Calories: 108     Carbs: 8     Fat: 2     Protein: 16

**These nutrition facts are based on eliminating the butter and using egg whites

Friday, April 20, 2012

Perfect Waffles

Last week was spring break and my husband was out of town.  So we went and stayed at my parent's house for a couple of days to shake things up.  My kiddos requested that Grandma make them waffles every morning.  Oh my.  I had forgotten how amazing my mom's waffles are!  They come from the original Betty Crocker cookbook--which I've learned has changed through the years.  All this time I was thinking I was making THE recipe I grew up with since I have a new edition.  But I was wrong.  And immediately knew it at first bite last week.  The waffles in MINE are totally different than the original cookbook.

These waffles are amazing!  They are light and fluffy and perfectly flavored.   They have that "just right" crunch on the outside with the correct softness beneath it.  The egg ratio is perfect as the whipped egg whites create so much airiness.  I'm SO happy to be reunited with this recipe.  I usually prefer pancakes over waffles--but not anymore.  I can't believe I never checked my recipe against my mom's but I thought I'd just fallen out with waffles.  But no more! Oh, and it goes amazingly well with maple syrup but even more AMAZING with buttermilk syrup.

Everyday Waffles from "The Original Betty Crocker Cookbook"

1 3/4 C flour
1 Tablespoon baking powder
1/2 tsp salt
2 beaten egg yolks
1 3/4 C milk
1/2 C vegetable oil
2 stiffly beaten egg whites

Combine the dry ingredients.  In a separate bow, combine yolks, milk, and oil.  Stir into dry ingredients.  Fold in whipped egg whites leaving in a few fluffs.  Pour onto a hot waffle iron.

Buttermilk syrup:

1/2 C butter
1 C sugar
1/2 C buttermilk
1 tsp karo syrup

Bring to a boil then remove from heat.  Stir in 1 tsp baking soda and 1 tsp vanilla.

Friday, April 13, 2012

Hash Brown Quiche

My daughter was baptized on Saturday.  What a special day! She was baptized in the morning so we had our family back to our house for a brunch after.  This hash brown quiche was a hit!  It's been a long-standing favorite at our house so I was pleased with how the three pans I made were inhaled.  We make it often for dinner (we're big fans of breakfast for dinner).  It is SO delicious!  The hash browns combine with the eggs and milk and become fluffy and light.  As it cooks the majority of the swiss and cheddar cheese rise to the top and becomes ooey and gooey (yes, that's a word).  And the ham adds the right amount of saltiness to this savory dish. This is such an easy, delectable casserole.  You might find yourself going back for seconds fourths! 

 It worked out perfectly for a busy morning as I made them the night before and refrigerated them until I popped them in the oven in the morning.  I'd never made it this way before and was nervous it would turn out.  Thankfully they turned out exactly as they have in the past when I've made them according to the recipe.  My kid's voted that we make this on Christmas morning now instead of our usual casserole.  I think maybe we'll just make this in addition to our traditional dish.

Hash Brown Quiche from "The Essential Mormon Cookbook"

8 shredded frozen hash brown potato patties (I usually use 9 for a 9x13 pan)
1/2 cup butter, melted (I use 1/4 C)
1 C cubed precooked ham
1 C shredded cheddar cheese
1 C shredded swiss cheese
8 eggs
2 cups milk or cream
1/2 teaspoon salt

Place hash brown patties in greased 9x13 inch pan.  Pour melted butter evenly over the surface of potato patties.  Bake at 350 F for 20 minutes.  Remove from pan.  Sprinkle potatoes with ham and cheeses.  In a large bowl beat eggs.  Add milk or cream and salt.  Stir.  Pour mixture over cheese and ham.  Bake at 350 F for about 30 minutes.  Serves 8.

Tips:  If making the night before--just skip the step where you bake the potatoes.  Just pour butter over potatoes and proceed to adding the cheeses and ham on top of them.  After quiche is assembled, cover and refrigerate overnight.  Also, I bake it covered with the foil. 

Wednesday, March 14, 2012

Spicy Honey Chicken

Wow!  Where has the last couple of weeks gone? Things have been busy around here--as I know you all can relate to.  We've had sick kids, lessons to be to, church assignments to be filled, doctors appointments, and the regular craziness--you know the drill. And to top it off--this time change is killer. 

Whew!  Anyways.  I couldn't put off posting this recipe any longer.  Oh how I love a good salty and sweet combination.  This recipe satisfies that craving perfectly.  There is a slight spice in the rub but also a good amount of saltiness.  I love the honey glaze as it pairs so well with the rub.  I also really like cooking with boneless, skinless chicken thighs lately.  I love how moist and flavorful the meat is.  This recipe will be a perfect addition to the regulars that you throw on the grill.  I wanted to do this on the BBQ but we had a horrible snow storm the day I made it.  But I think it would be even better grilled! 

Spicy Honey Chicken from "Our Best Bites" cookbook

8 boneless, skinless chicken thighs; about 2 pounds
2 tsp vegetable oil

Glaze
1/2 C honey
1 T cider vinegar

Rub
2 tsp granulated garlic
2 tsp chili powder
1/2 tsp onion powder
1/2 tsp coriander
1 tsp kosher salt
1 tsp cumin
1/2 teaspoon chipotle chili powder

1. Preheat grill to medium-high heat or about 400 degree F.
2. Combine rub ingredients in a small bowl.
3. Trim any visible fat off the chicken thighs, rinse, and pat dry with a paper towel.  Drizzle oil over chicken and rub it in with your hands.  Rub the spice rub into the chicken thighs. Grill for 3-5 minutes on each side.
4. For the glaze: while the chicken is cooking, warm honey in the microwave for about 15 seconds.  Whisk in vinegar.  Reserve 2 tablespoons glaze and brush the rest of the chicken in the final moments of cooking.  Remove chicken from the grill and allow to stand 3-5 minutes.  Drizzle reserved 2 tablespoons of glaze over the chicken while it's standing.

Wednesday, February 22, 2012

Lion House Taco Soup

Oh how we love Mexican food at our house.  One thing I  just can't resist when we go out for Mexican is the tortilla chips and salsa.  So this soup becomes irresistible for me when you add tortilla chips.  And don't forget the cheese (my kid's favorite addition) and sour cream. This is comfort food at it's greatest, in my opinion.  I grew up having this soup and now make it often for my own family. It is so delicious and SO easy.  

It's the perfect food to make on a cold, wintery day because it's hearty, filling, thick, and packed with flavor.  I love the combination of beans, corn, onions, tomatoes, and taco flavoring.  I also love that I always have the ingredients on hand and can whip it up in a pinch.  You could also throw it in the crock pot in the morning and let the flavors meld together all day.  It's always yummy the first day--but even better the second day as everything marries together.  I've modified the recipe a little bit and do two different kinds of beans for even more protein and fiber.  When my kid's were small and wouldn't eat soup, I'd buy the "scoop" type of tortilla chips and put little spoonfuls of it in each chip and they'd gobble their "boats" up with no complaining!

Lion House Taco Soup adapted from "The Lion House Cookbook"

Brown together:
1 lb ground beef
1 medium onion

Add:
1 16oz can black beans (drained)
1 16oz can pinto beans (drained)--or another kind you like better
1 16oz can cut corn (drained)
1 28oz can petite diced tomatoes
1 16oz can tomato sauce
1/2 pkg mild taco seasoning (more if desired)

Simmer 20 minutes.  Serve over tortilla chips and top with cheese and sour cream.

Tips: I throw the beans and corn into a colander to drain them and then I rinse them off with water.  I'm not sure if that makes it more nutritious but I feel better about it that way.  I often add the taco seasoning and then taste it to see if it needs a little bit more. 

Tuesday, February 14, 2012

Crockpot Lemon Herb Chicken

This is one of those easy recipes that I find myself making when I need to go grocery shopping.  I always have the ingredients on hand and my family always gobbles it up.  Double win! You can literally dump it into the crock pot in the morning and have a nice, hot meal at dinnertime. I try to not cook very much with "cream of" anything--but this is one of  those old standby recipes that we still love.  The chicken gets really moist as it simmers in the crock pot with a subtle lemon flavor.  You can modify the lemon herb seasoning to make it be as weak or as strong as you like.  The sauce is then served over rice. Also--make sure you use the "McCormick" brand of lemon herb seasoning.  We've tried different brands and it just doesn't turn out the same.

Lemon Herb Chicken from Melissa Bowen

4 chicken breasts (I like to use chicken tenders--they're extra moist)
1 can cream of chicken soup
1/2- 3/4 Tablespoon "McCormick" lemon herb seasoning
1/4 C butter

Melt butter and add to soup and seasoning mix.  Pour half into crock pot.  Add chicken and pour over remaining soup mixture.  Cook 5 hours on LOW in crock pot.  Serve over rice.  

Tips: I use the 98% fat free cream of chicken with no difference in taste.  I've also eliminated the butter for a lower fat version and still had it turn out great.  It might make the chicken slightly less moist but not too noticeably, though.  

Thursday, December 15, 2011

Cauliflower Soup

It snowed here today for the first time of the season!  It finally feels like the holidays.  I want to wrap up in a blanket and sit by the fire. So it feels like the perfect day to post a yummy, flavorful soup that we made this weekend.  I got this fabulous recipe from the meeting I'd posted about a week or two ago.  This recipe is so delicious and a fantastic comfort food to make on a cold, snowy day. The  finely chopped cauliflower and celery combine incredibly well with the base of chicken flavor and thickened evaporated milk.  The ingredient list is surprisingly short but don't let that fool you--the flavors marry perfectly. My kids both even had seconds of this!  We love the Wisconsin Cauliflower soup at Zupas and my husband said it had the same exact flavor but just with delicious chunks (as that one is pureed).  We will definitely be making this one again!  It's such a nice change from the standard soup.


Cauliflower Soup from Valarie Andrus

4 cubes chicken bullion
4 C. water
1 head cauliflower
2 stems celery
12oz. can evaporated milk
5 Tbs. butter
4 Tbs. flour
salt and pepper

Directions:
In a large saucepan, dissolve bullion cubes in boiling water.  Add finely chopped cauliflower and celery and cook until vegetables are soft.  In a separate bowl stir flour into melted butter to make a paste.  Stir evaporated milk into the paste until smooth.  Add to the broth mixture and stir with wire whisk.  Add salt and pepper to taste.  Serve with crackers and sprinkle with cheddar cheese if desired.


Sunday, November 13, 2011

Chicken Fajita Marinade

This is a super easy, flavorful, tasty marinade that I've been using for years at our house.  I love the combination of the red wine vinegar, oregano, chili powder, and garlic powder.  The vegetable oil also makes the meat very tender and moist. And I also LOVE that the ingredients in it are something that I always have on hand.   The recipe says to marinate the meat for at least 4 hours--so I can easily throw it together in the afternoon and have a delicious dinner.  Oh, and did I already mention how easy it is?  Obviously that gets extra points around here.

Also, I recently had white corn tortillas with fajitas at one of my favorite mexican restaurants.  And I really, really loved the flavor, texture, and healthier option.  I usually use flour tortillas with this marinade--but the white corn tortillas were amazing, as well.

Fajita Marinade from Betty Crocker's Cookbook

1/4 C vegetable oil
1/4 C red wine vinegar
1 teaspoon sugar
1 teaspoon dried oregano leaves
1 teaspoon chili powder
1/2 teaspoon garlic powder
1/2 teaspoon salt
1/4 teaspoon pepper

Mix all the ingredients in a resealable plastic food-storage bag.  Add about 1 pound of boneless (you can also do 2-3 lbs bone-in beef or pork) chicken.  Seal bag and refrigerate at least 4 hours (turning meat occasionally)--but no longer than 24 hours. 
 I then add chopped onions and green pepper.  I finely chop the onions and peppers so my kid's seem to notice them less.  You can grill the meat and throw away the marinade (it must be boiled to be served as a sauce).  But, I like to put it all in a pan and cook it all with the marinade--as it creates a delicious, moist flavor. 
Add your favorite toppings and enjoy!

Sunday, November 6, 2011

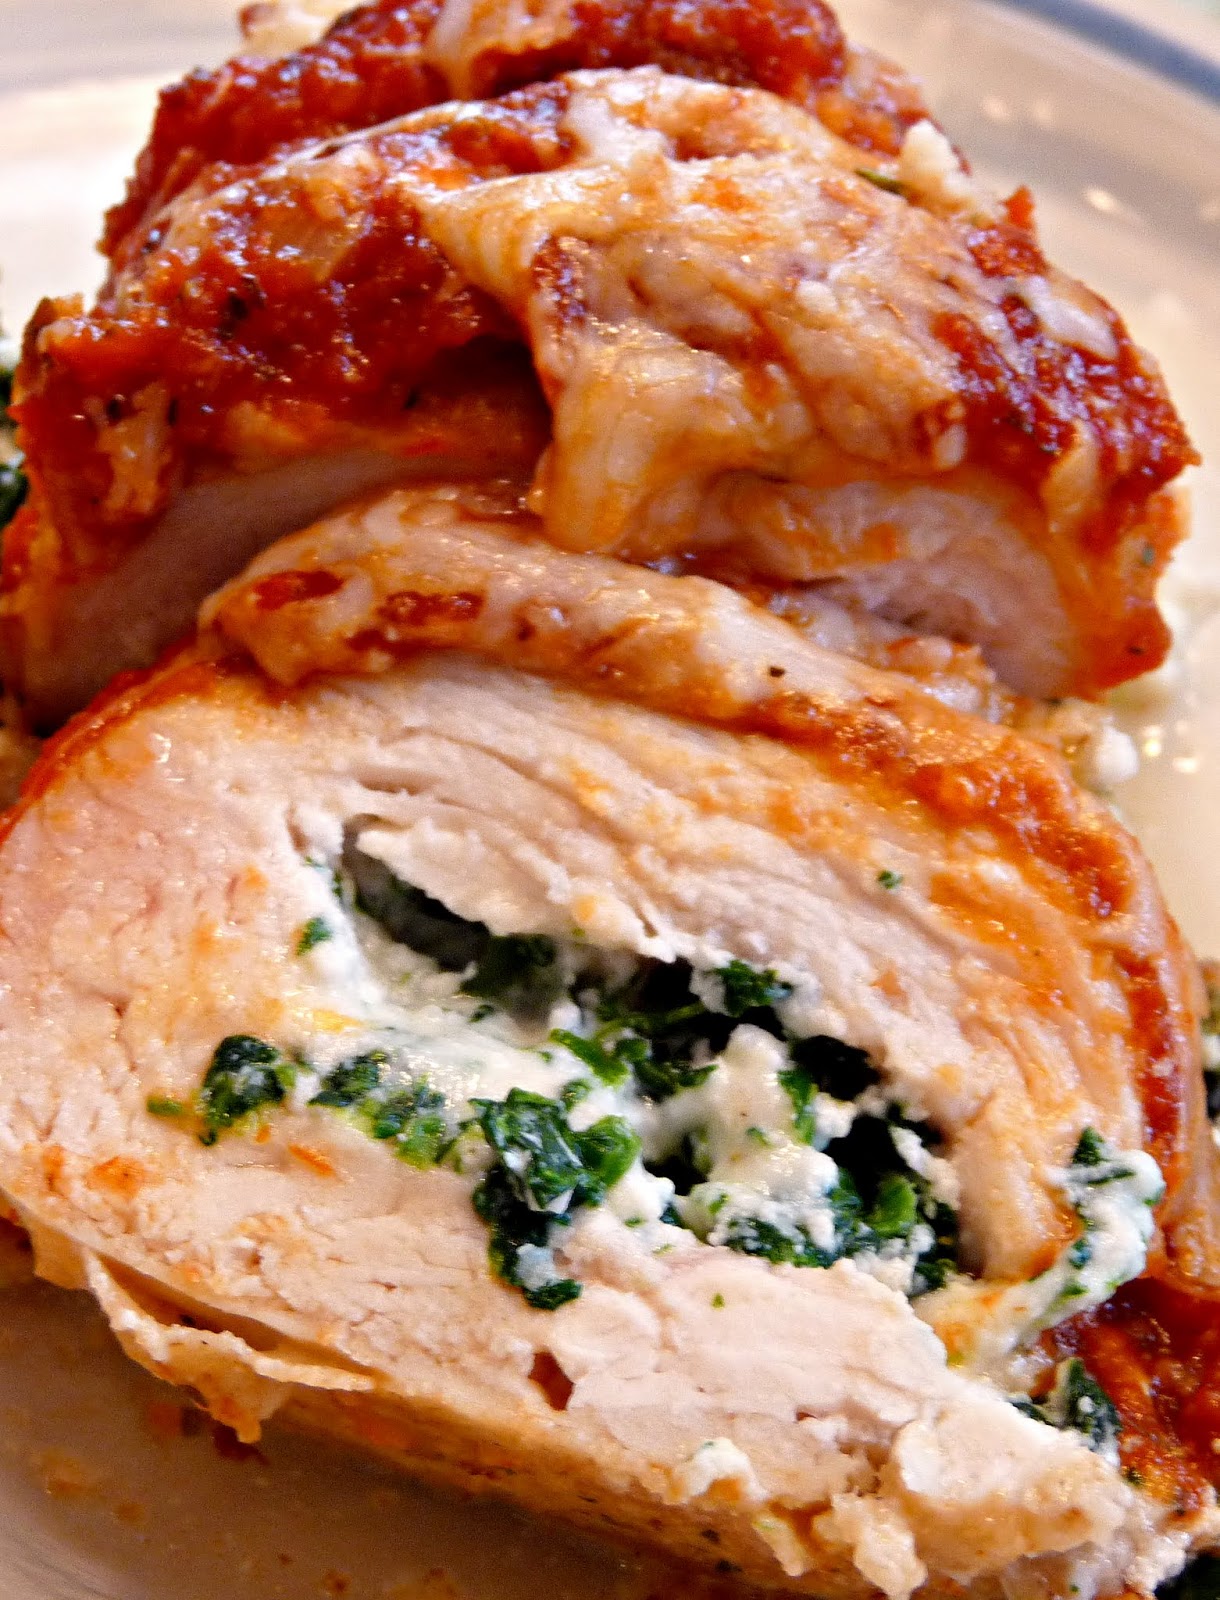
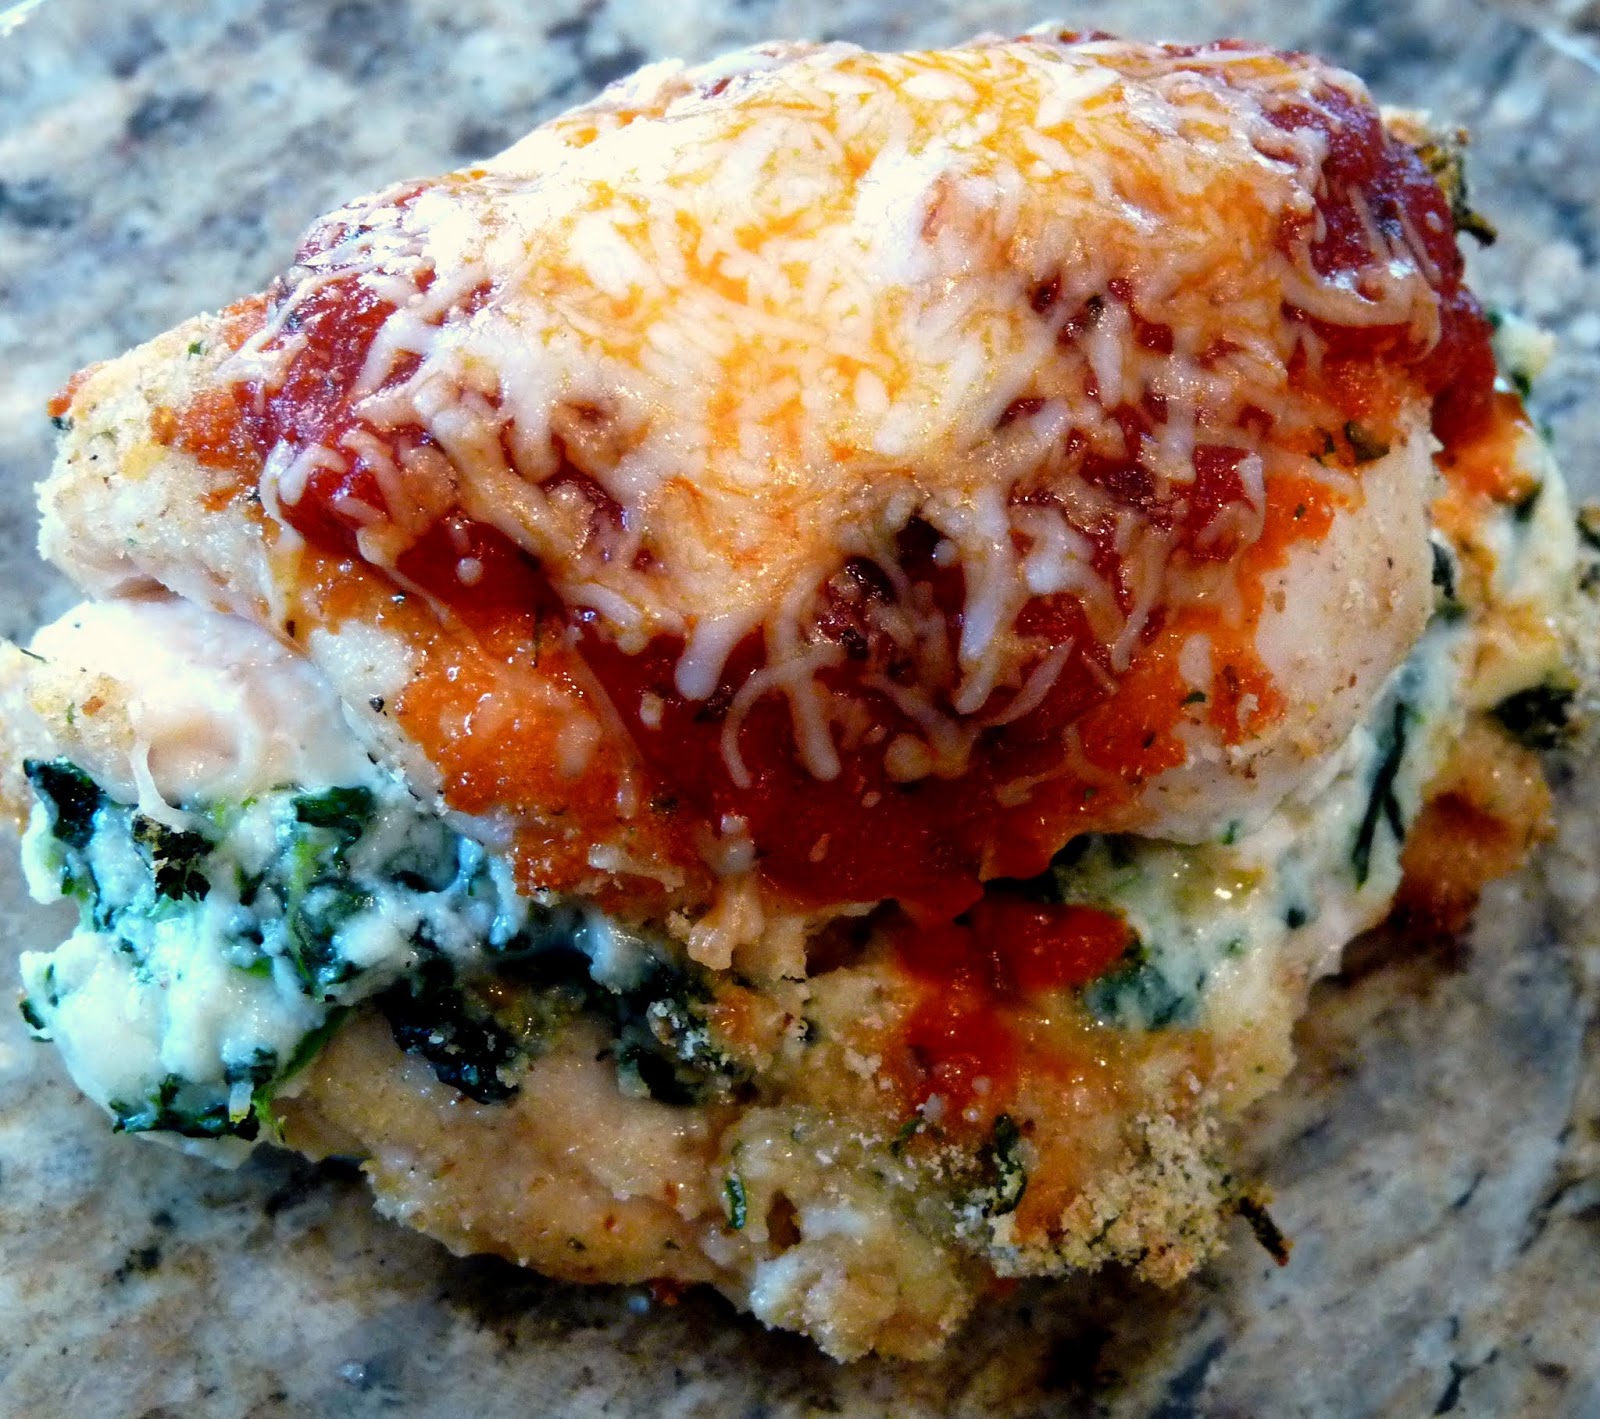
Chicken Rollatini with Spinach alla Parmigiana

To say that I've been in a blogging funk would be an understatement.  And then in feeling so behind, I've let myself get overwhelmed by how many recipes I've documented (on my camera) and not posted.  So....here goes to just pushing past the backlog and posting something.  But this recipe is WAY more than just something. My family was raving about it.  We all kept saying over and over how delicious it was.  The chicken is breaded in an italian breadcumb and parmesan cheese mixture.  The filling of ricotta, mozzarella, and spinach is a fantastic combination.  I was worried that my family would balk at the spinach but it blends very well and definitely doesn't stand out in the flavors.  My kids never even noticed it!  Topped with my favorite marinara and mozzarella--it was a huge hit!  My husband could not stop talking about how delicious it was. 
Chicken Rollatini with Spinach alla Parmigiana from Skinnytaste


8 thin chicken cutlets, 3 oz each
1/2 cup whole wheat Italian seasoned breadcrumbs
1/4 cup grated parmesan cheese, divided
6 tablespoons egg whites or egg beaters
5 oz frozen spinach, squeezed dry of any liquid
6 tbsp part skim ricotta cheese
6 oz part skim mozzarella
olive oil non-stick spray 
1 cup pomodoro sauce or your favorite marinara sauce
salt and pepper to taste


Washand dry cutlets, season with salt and pepper. Preheat oven to 450°. Lightly spray a baking dish with non-stick spray. Combine breadcrumbs and 2 tbsp grated cheese in one bowl and 1/4 cup egg beaters or egg whites in another. Shred or finely chop1.5 oz of mozzarella cheese and combine with remaining grated cheese, spinach (make sure you squeeze it dry), 2 tbsp egg beaters, and ricotta cheese. Lay chicken cutlets down on a working surface and spread 2 tbsp of spinach-cheese mixture on each cutlet. Loosely roll each one and keep seam side down. Dip chicken in egg mixture, then in breadcrumbs and place seam side down in a baking dish (no toothpicks needed). Repeat with the remaining chicken. When finished, lightly spray with olive oil.  Bake 25 minutes. Remove from oven, top with sauce then cheese. Bake until cheese is melted and bubbling, about 3 more minutes. Serve with additional sauce on the side and grated cheese.

Serves 8 (1 stuffed breast) WW Points: 4  WW Points+: 5

Thursday, October 20, 2011

Quick Chicken Cacciatore

When we were first married, I used to regularly go to cooking classes taught by our local grocery store.  My husband worked nights at the time while he was finishing up college and I was teaching first grade.  So I loved having something to do while he was gone and learned a lot of basics about cooking.   And beings that I was also very busy grading papers and writing lesson plans at night--I also loved gathering recipes that were quick and easy to make.  I was excited to try this recipe that was demonstated because it fit that description perfectly!   It really is so delicious and tastes a lot fancier than it is to make.  I especially like making it with fresh linguine (found in the refrigerator section).  Unless you're more talented than me and can make your own linguine.  But then that probably would change the title from Quick to Complicated, right?  The onion, green pepper, and fresh garlic simmer with the chicken and create a fantastic italian flavor.  The italian seasoned tomatoes also make this so easy.  You can play around with it and add more spices if you like.  And parmesan cheese on top of hot, bubbling cacciatore is a must!  You'll love this simple, easy, delicious meal!

Quick Chicken Cacciatore from Pampered Chef

1 pkg breaded precooked chicken breast (6-8 patties)
1 small white or yellow onion
8 oz fresh linguine (in refrigerator section)
2 cans (14.5 oz) Italian-seasoned diced tomatoes
Fresh cloved garlic
1 medium green bell pepper (optional)

Cut chicken patties and bell peppers into strips.  Chop onion.  Cook linguine according to package directions.  Drain and keep warm.  Meanwhile, heat skillet over medium heat.  Lightly spray with olive oil.  Add chicken and cook for 2-3 minutes (stirring frequently).  Add tomatoes, bell pepper, onion, and fresh garlic.  Bring to a boil; cover.  Reduce heat to simmer for 8-10 minutes or until vegetables are tender.  Serve over hot linguine.  Sprinkle with parmesan cheese, if desired. 

Friday, June 24, 2011

Cilantro Lime Shrimp

As I mentioned in my last post, I'm on a role in trying different proteins besides chicken.  And while I love shrimp--I have never cooked with it.  I'm kind of embarrassed to admit that. I think that cooking it somehow intimidated me.  And after cooking this dish I have no idea why.  I think I, unnecessarily, worried that I would cook it wrong.  Well, now I know that shrimp is SO easy to cook with and is incredibly fast.  I don't know why I have skipped over shrimp recipes all these years.  I'm so excited to try other shrimp recipes now. 

But back to this recipe.  It is SO delicious, simple, and packed with flavor.  The shrimp cooks quickly in a little bit of olive oil and then you add fresh garlic and salt and pepper.  What could be bad with fresh garlic in it?  It tastes like a complex dish--but is deceiving as you just then add some fresh lime juice and fresh cilantro.  My husband even asked me if I'd cooked it in a lot of butter as it tasted too delicious and was surprised when I said there was no butter.  I do have to admit that I had some fresh cilantro in my fridge reserved for this dish and it had gone bad.  So I had to substitute dried cilantro and it still tasted amazing.  That means it would be even more flavorful and delicious with the fresh stuff.  I will definitely be doing this one again and so I'll update you on the fresh cilantro taste. Enjoy!

Cilantro Lime Shrimp from Skinnytaste

2 tsp olive oil

2 lb shrimp, shelled and deviened
6 cloves garlic, crushed
1/2 cup chopped fresh cilantro
1 lime
salt and pepper

Heat a large frying pan on medium-high heat. Add oil to the pan, when hot add shrimp. Season with salt and pepper. When the shrimp is cooked on one side, about 2 minutes, turn over and add garlic. Sauté another minute or two until shrimp is cooked, careful not to overcook. Remove from heat. Squeeze lime all over shrimp and toss with cilantro. Serve hot.

*Serves:6; Weight Watcher Points Plus: 4

Sunday, June 19, 2011

Asian Turkey Meatballs with Lime Sesame Dipping Sauce

I have been trying to shake up our menu lately with a protein besides chicken.  So I went on the search for something that was healthy (and not chicken) and was so excited when I came across these.  These. Are. So. AMAZING!  I made these for my family and we couldn't stop drooling over them and eating every last one.  My kids and husband were begging for more long after they were gone.  It was the kind of meal where kids and adults are arguing over who gets the last one. And so I made them a few days later for a family BBQ and they were inhaled.  I love the turkey combined with scallions, cilantro, sesame oil, ginger, and soy sauce.  It creates such a flavorful Asian-inspired dish.  I also loved the dipping sauce drizzled over the turkey meatballs.  We found it a little strong to dip in--but perfect if half the sauce was poured over them.  I know I've mentioned before that I will go weeks and usually months before repeating a dish.  But I WANT to make these again and again.  I could have them on our menu every week and not get tired of them.  And that's quite an endorsement for us!  I also paired it with this yummy Asian Cabbage salad for a full, delectable meal.

Asian Turkey Meatballs with Lime Sesame Dipping sauce from Skinnytaste.com

Servings 4 ; Size: 3 meatballs ; Weight Watchers: 7 pts+

1/4 C panko crumbs
1 1/4 lbs 93% lean ground turkey
1 egg
1 T ginger, minced
1 clove garlic, minced
1/2 tsp salt
1/4 C chopped fresh cilantro
3 scallions, chopped
1 T low sodium soy sauce
2 tsp sesame oil

Dipping sauce
4 T low sodium soy sauce
2 tsp sesame oil
2 T fresh lime juice
2 T water
1 chopped fresh scallion.

Preheat oven to 500 degrees F. Mix ground turkey, panko, egg, salt, scallions, ginger, cilantro, 1 T soy sauce and 2 tsp oil and mix with your hands until combined well.  Shape 1/4 cup meat mixture into a ball and transfer to a baking dish.  Repeat with remaining meat mixture.  Bake until cooked through, about 15 minutes.

For the dipping sauce mix together lime juice, water, soy sauce and remaining 2 tsp of oil in a bowl.  Add scallions.  Transfer meatballs to a serving dish.  Stir sauce, then drizzle meatballs with 1 T sauce (I did half the sauce drizzled over).  Serve meatballs with remaining sauce, about 1 T per person.  Chances are you won't use all the dipping sauce.  Makes 12 meatballs.

Wednesday, May 4, 2011

Parmesan Chicken

This meal is a favorite at our house!  It is definitely one that makes a regular appearance on my menu. Crushed ritz crackers, parmesan cheese, and garlic salt create a fantastic, slighty crunchy outside to a really moist chicken.  The chicken is dipped in yogurt before it gets this tasty coating and the yogurt makes for a really tender, flavorful chicken.  My kids love helping make this one by crushing the crackers.  As you can see...my little guy crushed these as I usually do them finely crushed.  But who's complaining when your 4 year old is busy and excited to help? 

I shook it up this time and tried to make it a little bit healthier as I'm on a quest to lose some of my baby weight and also make up for eating too many of those cookies I posted about earlier?!? I used whole wheat ritz and my fabulous neighbor (thanks Serene) lent me greek yogurt since I left the store without the yogurt and didn't want to go back.  I also omitted the butter and just used Pam spray on it.  I actually didn't taste a difference in any of the variations that make it more healthy.  The only difference would've been that the chicken might have been a teensy (not too noticeable, though) bit less moist without the butter.  Butter makes anything better, right?  So with or without the butter this chicken is SO fantastic!

Parmesan Chicken from "The Essential Mormon Cookbook"

2 C crushed Ritz crackers
3 T grated parmesan cheese
2 tsp garlic salt
8 boneless chicken breasts (I prefer boneless/skinless chicken tenders)
1 C plain yogurt
1/4 C butter, melted

Combine cracker crumbs, parmesan cheese, and garlic salt.  Dip each piece of chicken in yogurt to coat and then in crumb mixture.  Arrange in greased 9x13-inch baking dish.  Drizzle with melted butter.  Bake at 350 for about 45 minutes.  Serves 8.

Tuesday, May 3, 2011

Healthy Baked Chicken Nuggets

I am always trying to find ways to get my son to eat protein.  He would be happy to live off of pancakes if given his way.  So you can imagine how happy I was when he and my daughter literally INHALED this dinner!  I was searching the web for some healthy dinners and I came across Skinnytaste.com.  Love it!  Gina has so many yummy looking dinners and she includes all the nutrtional information.  I pretty much used recipes from just her blog for my menu this week. 

I was excited to try this recipe. I knew my kids would love it.  What kid doesn't love chicken nuggets?  And I was not disappointed.  The breading on it was light and slightly crunchy and I love that they are baked--so they are definitely healthy.  I also loved the oh so subtle parmesan cheese flavor in it.  I had a cookie sheet full of nuggets and was worried that I had made too much.  But oh how mistaken I was. My kids were begging for the nuggets off my husband and I's plates.  So next time I will definitely make a lot more. 

She gave such a cute idea with this recipe to let your kids eat it with toothpicks.  So I hammed it up and told them we were having a really special dinner.  They were pretty excited about it.  And were even more thrilled when I told them the special part was that they could only use toothpicks as their utensil for dinner.  I made everything bite size and they probably have never eaten so much at dinner.  So I will definitely be using toothpicks again and definitely be making these again. 

Healthy Baked Chicken Nuggets from skinnytaste

16 oz (2 large) skinless boneless chicken breasts, cut into even bit sized pieces
salt and pepper to taste
2 tsp olive oil
6 tbsp whole wheat Italian seasoned breadcrumbs
2 tbsp panko
2 tbsp grated parmesan cheese
olive oil spray 

Preheat oven to 425°. Spray a baking sheet with olive oil spray. Put the olive oil in one bowl and the breadcrumbs, panko and parmesan cheese in another. Season chicken with salt and pepper, then put in the bowl with the olive oil and mix well so the olive oil evenly coats all of the chicken. Put a few chunks of chicken at a time into the breadcrumb mixture to coat, then on the baking sheet. Lightly spray the top with olive oil spray then bake 8 - 10 minutes. Turn over then cook another 4 - 5 minutes or until cooked though.

Servings: 4 • Serving Size: 1/4th of nuggets • Old Points: 4 pts • Points+: 4 pts

Calories: 164.9 • Fat: 4.6 g • Protein: 22.1 g • Carb: 7.7 g • Fiber: 0.9 g • Sugar: 0.1 g

Sunday, March 20, 2011

Teriyaki Cranberry Chicken

Where, you might ask, have I been?  Well....long story short is having a baby.  We welcomed a new little guy to our family on January 2nd.  So now we have three little amazing munchkins at our house. We named him Cole Harris.  The middle name Harris comes frome my amazing grandfather.  We are quite smitten by our new addition.

I was having contractions whenever I would stand or walk in the last trimester and was rather uncomfortable--so there wasn't a ton of grand cooking or baking happening at our house. And since his birth I've been busy doing baby, baby, and more baby.  He is so sweet and really, really, really likes being held all day and all night.  So it's made cooking a little difficult.  There.  I've put all my excuses out there and now on to the cooking that I've missed doing...

I went back through all my old pictures of food that I have yet to blog about.  And I couldn't believe that I'd never posted this recipe.  It is so delicious!  And so easy!  What could be better than that? I like doing it with boneless/skinless chicken thighs as it makes for a really moist and flavorful dish.  My kids literally devoured this the first time I made it and requested it be made again...soon.  I kind of have dinner A.D.D and rarely make a dish more than once in a month.  Often I will go months before repeating a recipe.  I just like to try new things and rotate through all the ones we love (which there are quite a few of).  However, I made this recipe again within a couple of weeks of making it because we liked it so much.  It really is very flavorful with the teriyaki and then the cranberry adding just the right amount of sweetness.  Don't be fooled by the small amount of ingredients--it is delicious!

Teriyaki-Cranberry Chicken from Debbie Nydegger

4-6 chicken breasts (I use 6-8 chicken thighs)
1 (16oz) can cranberry sauce
1 C. teriyaki sauce (Yoshida's brand works great)

Place chicken in lightly greased 9x13inch pan.  Mix cranberry sauce and teriyaki sauce together and pour over chicken.  Bake at 325 for 1 hour.  Serve with rice.

Thursday, September 2, 2010

Crispy Chicken Breasts

I don't know about where you live--but fall is in the air in my neck of the woods.  School is fully back in swing and the last week has been seasonably cooler and the air has that autumn crispness.   I love it!  Now, if only fall would just stay for months and never turn into winter.  Things have been kind of crazy this summer at our house and so I'm ready for more routine.  For one thing--I'm pregnant and have been sick, sick, sick and am finally getting over that and so I'm ready to get back in the kitchen and cooking and sharing recipes.   I sent my oldest to first grade this year and my baby just started preschool this morning.  And so hopefully that will give me more time to blog now!

Now on to the food... This recipe is comfort food at it's best.  And I crave comfort food as the weather gets cooler.  I've seen a few different variations of this recipe floating around the internet.  But this is the one that came many, many years ago in a church cookbook that my mom had.  It is amazing!  The chicken is ooey, gooey (how's that for a description) with the melted Swiss cheese and it melds perfectly with the stuffing and chicken flavors.   And I love that it's served over Rice Pilaf because it adds a great texture and delicious flavor.  And it's one of those meals that is so easy because you just throw it together and then throw it in the oven and let it do it's thing. 

Crispy Chicken Breasts from Erin S.

6-8 boneless, skinless chicken breasts (I use chicken tenderloins--they stay more moist)
1 (10 3/4 oz) can cream of chicken soup
1 (6 oz) box Stove Top Stuffing
1 lb. swiss cheese
1 stick butter (I use 1/2 stick)

Arrange chicken in a 9x13 pan.  Slice swiss cheese and layer over chicken.  Mix soup with 1 can milk and pour over chicken.  Sprinkle with dressing.  Melt butter and drizzle over top.  Cover with foil and bake at 350 degrees for 45 minutes.  Can remove foil at end of baking to make stuffing a little crispy.  Serve over rice pilaf.