Showing posts with label Dessert. Show all posts

Thursday, August 9, 2012

Homemade Buttery Soft Pretzels

My daughter is always begging to buy the frozen pretzels whenever they sample them at Costco.  I think they taste dry and bland so I never acquiesce.  But I told her we could make our own homemade pretzels as one of our activities this summer.  We have a calendar all made out where we assign one fun thing to do each day if they finish their chores before 10am.  I couldn't believe how excited she was when she saw pretzels on the calendar for the day.  

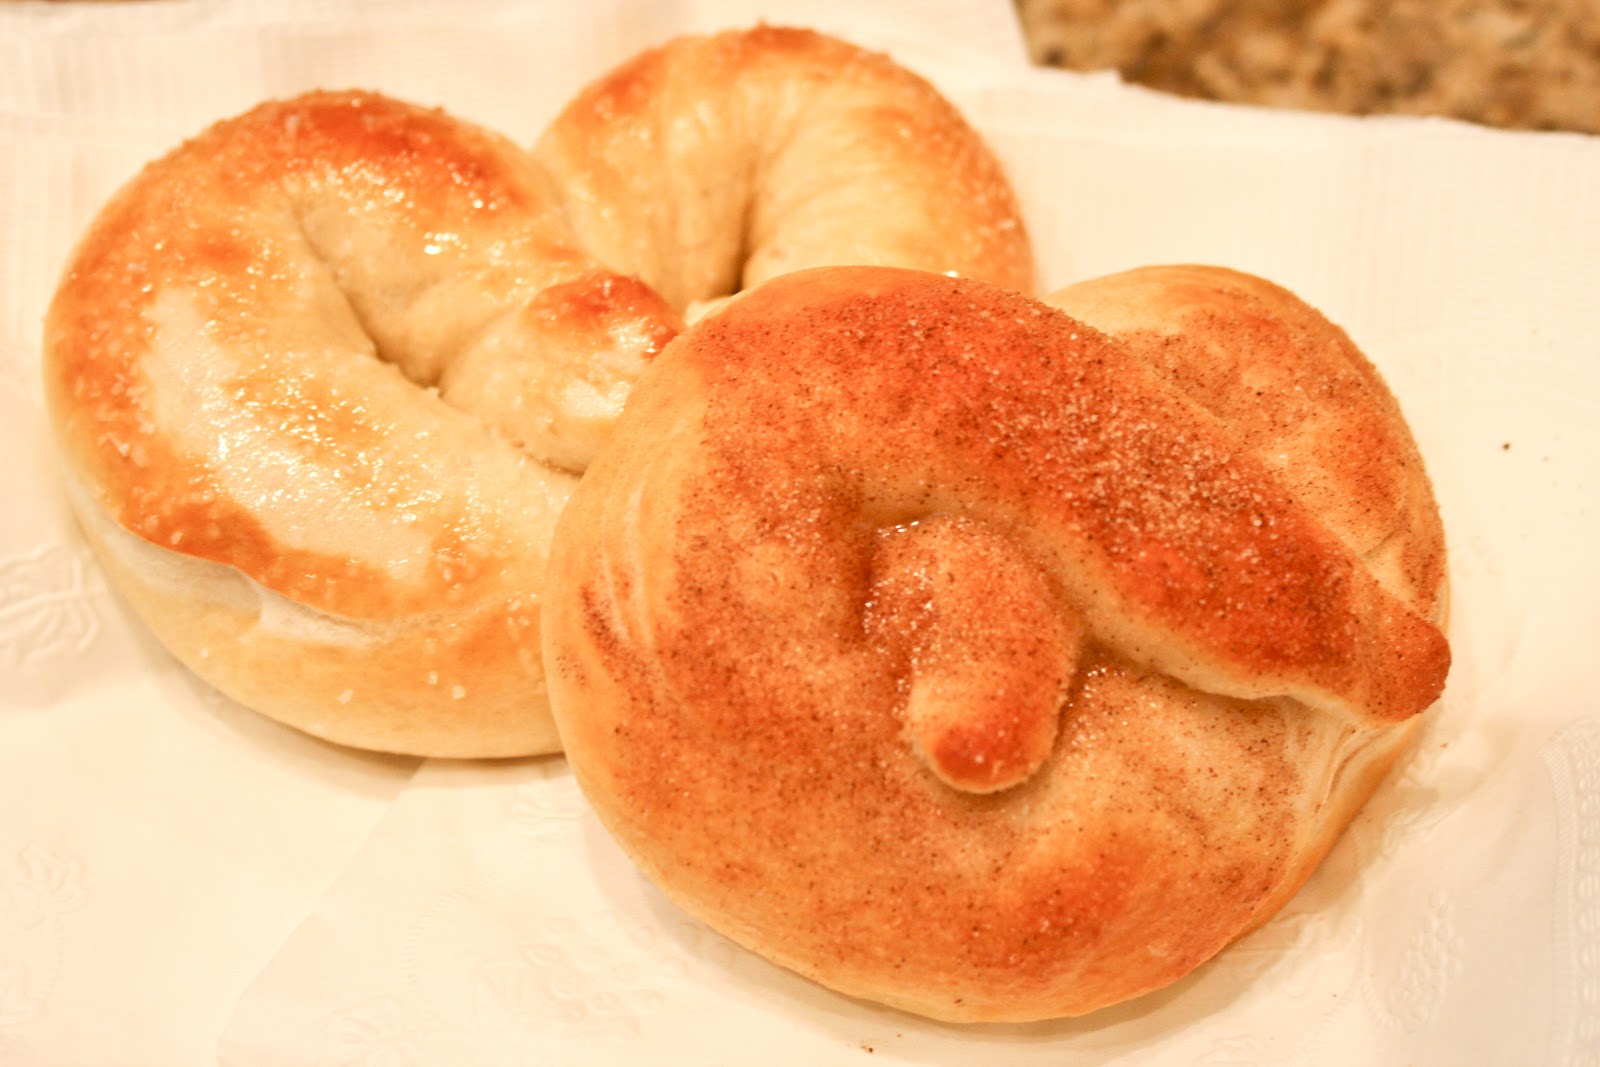
I was kind of indifferent about them--but OH BOY how wrong I was.  These are AMAZING!  Seriously.  I've always loved when we can grab a pretzel from Auntie Ann's at the mall.  But I'll never buy them again.  These taste exactly like they came from those yummy pretzels stands--but even better!  And SOOO much cheaper.  And my kiddos loved helping shape the pretzels--double bonus.  They are buttery and soft on the inside and so addicting.  We loved them hot and fresh out of the oven with the kosher salt and butter on them.  My kiddos preferred the cinnamon and sugar coating.  My husband usually prefers chocolate but even he gushed over these.  So much so that we made them again a couple of days later.  And on the second batch we both decided that we loved it with both toppings.  Make sure you don't skip the soda bath part--it's what makes the pretzel!  You won't be able to tell a difference between the pretzels you buy at the mall and this recipe.  Trust me!

Buttery Soft Pretzels from Allrecipes

4 teaspoons active dry yeast
1 teaspoon white sugar
1 1/4 cups warm water (110 degrees F/45 degrees C)
5 cups all-purpose flour
1/2 cup white sugar
1 1/2 teaspoons salt
1 tablespoon vegetable oil

1/2 cup baking soda
4 cups hot water
1/4 cup kosher salt, for topping
Directions

In a small bowl, dissolve yeast and 1 teaspoon sugar in warm water. Let stand until creamy, about 10 minutes. In a large bowl, mix together flour, 1/2 cup sugar, and salt. Make a well in the center; add the oil and yeast mixture. Mix and form into a dough. If the mixture is dry, add one or two tablespoons of water. Knead the dough until smooth, about 7 to 8 minutes. Lightly oil a large bowl, place the dough in the bowl and turn to coat with oil. Cover with plastic wrap and let rise in a warm place until doubled in size, about 1 hour.

Preheat oven to 450 degrees F (230 degrees C). In a large bowl, dissolve baking soda in hot water.
When risen, turn dough out onto a lightly floured surface and divide into 12 equal pieces. Roll each piece into a rope and twist into a pretzel shape. Once all of the dough is all shaped, dip each pretzel into the baking soda solution and place on a greased baking sheet. Sprinkle with kosher salt. Bake in preheated oven for 8 minutes, until browned.

Brush with butter after taking out of oven.  Dip in cinnamon & sugar if desired (but eliminate kosher salt step if doing this). 


Amount Per Serving  Calories: 237 | Total Fat: 1.7g | Cholesterol: 0mg


Tuesday, July 17, 2012

Strawberry Shortcake

You know when you have to fill out those "Get to Know You" questionnaires every so often?  And when it asks your favorite dessert? I can never think of one on the spot like that. My absolute favorite dessert?  The one that I could eat every day of the year if that was even possible.  With so many delicious front runners how's a girl to decide?  Well---after making this dessert I am reminded that Strawberry Shortcake is the answer.  Always.  And what a perfect, fresh summer dessert.  

I am a little unusual in that I don't like mine made with angel food cake.  I LOVE it made with a nice white or yellow cake.  And it must be topped with homemade whipped cream.  Must. (Sorry to all those Cool Whip lovers out there) 

So the other night I had a pint of strawberries that needed to be used and on a whim decided to whip up Strawberry shortcake.  I went in search and found a moist, decadent,flavorful white cake that I will use from here on out to make this dessert.  It complemented the strawberries and whip cream perfectly.  It was slightly dense with just the right amount of buttery richness.   My mouth is salivating just remembering it.  And it was super simple to throw together as it's one of those recipes for which you likely have all the ingredients on hand already. 

Strawberry Shortcake Cake from Allrecipes

1 cup white sugar
1/2 cup butter
2 eggs
2 teaspoons vanilla extract
1 1/2 cups all-purpose flour
1 3/4 teaspoons baking powder
1/2 cup milk

DIRECTIONS:
1.  Preheat oven to 350 degrees F (175 degrees C). Grease and flour a 9x9 inch pan or line a muffin pan with paper liners.
2.  In a medium bowl, cream together the sugar and butter. Beat in the eggs, one at a time, then stir in the vanilla. Combine flour and baking powder, add to the creamed mixture and mix well. Finally stir in the milk until batter is smooth. Pour or spoon batter into the prepared pan.
3.  Bake for 30 to 40 minutes in the preheated oven. For cupcakes, bake 20 to 25 minutes. Cake is done when it springs back to the touch.
4.  Top with fresh cut strawberries and whipped cream


Sunday, June 3, 2012

Lemon Bars

Oh how I love lemon bars!  When we go to potluck dinners I always find myself drawn to the lemon bars.  But then the crazy part is that I always forget about them when it comes time to make desserts at home.  Last night I found myself craving them and went in search of a good recipe.  I might be strange in that I don't like them to be insanely lemony or tart.  So you could definitely modify this recipe to add more lemon zest to make it more tarty.  The crust is a soft, delicious, shortbread base.  I also loved that the lemon filling set up perfectly and wasn't sticky or oozing off the crust (a problem in the past with other recipes).  It's a perfect summer dessert with the lemon flavor.  My husband is more of a chocolate lover and he even went back for seconds of these.  Enjoy!

Lemon Bars adapted from Allrecipes

2 1/2 cups sifted all-purpose flour
1 1/4 cup confectioners' sugar
1 1/4 cup butter, melted

4 eggs
2 cups white sugar
1 teaspoon baking powder
1/4 cup all-purpose flour
1/2 to 1 cup lemon juice

Preheat oven to 350 degrees F (175 degrees C). Grease a 9x13 inch pan. In a medium bowl, stir together 2 cups flour and confectioners' sugar. Blend in the melted butter. Press into the bottom of the prepared pan.  Bake in the preheated oven for 10-15 minutes, or until golden. In a large bowl, beat eggs until light. Combine the sugar, baking powder and 1/4 cup of flour so there will be no flour lumps. Stir the sugar mixture into the eggs. Finally, stir in the lemon juice. Pour over the prepared crust and return to the oven.
Bake for an additional 20-25 minutes or until bars are set. Shake powdered sugar over bars after taking out of oven. Allow to cool completely before cutting into bars.  

Tips: I may reduce the temperature to 300 after adding the filling and cook for a little longer at a lower temperature so the crust doesn't become overdone.  Add lemon zest (so as not to throw off the balance by adding too much liquid with lemon juice) if you like them more tart. 

Thursday, February 2, 2012

Oatmeal Coconut Chewies

I've made it my quest to start trying all the things pinned under my "recipes to try" Pinterest board.  Well, I can't even begin to describe how happy I am that I started with this recipe! I also love that the pin took me to one of my favorite blogs that I've been following for years.  Mel also supplied me with my very favorite chocolate chip recipe, too. So I knew these had to be good.  But back to these amazing cookies! They are perfectly chewy and just rich enough.  The coconut and oatmeal add such a nice texture and such a perfect "chew"--like the name insinuates. I love how simple the cookie is but it is rich, buttery, and SO delicious.  These will be added to our list of favorites, for sure. 


Oatmeal Coconut Chewies from Mel's Kitchen Cafe

1 C granulated sugar
1 C brown sugar
2 eggs
1 C (2 sticks) butter, softened to cool room temperature
2 tsp vanilla
1 tsp baking soda
1 tsp baking powder
1/2 tsp salt
2 1/2 C flour
1 C shredded, sweetened coconut
1 C quick oats.

Preheat the oven to 350 degrees.  In a large bowl cream together the sugar, eggs, butter and vanilla until light and fluffy.  Add the dry ingredients and mix until combined.  Drop by tablespoonfuls onto a greased or lined baking sheet.  Bake at 350 degrees for 9-11 minutes, until the cookies are set by not overly browned (bake a few minutes longer for a crispier version).  


Thursday, January 26, 2012

Downeast Maine Pumpkin Bread

Moist, delicious, perfectly spiced pumpkin bread.  It doesn't get any better, in my opinion.  I know I've mentioned in the past about my love affair with pumpkin. I think this bread would even be a hit with those who don't quite share the same level of pumpkin love that I do.  I've tried a few different pumpkin bread recipes and this is by far our very favorite.  I always lighten it up a bit by doing 1/2 cup of oil and 1/2 cup of applesauce.  But it is phenomenal either way.  My family always gobbles this bread up so quickly!  I love how soft it is and the spices blend together so well--no spice overwhelms the other so it's a perfect marriage.  Enjoy!

Downeast Maine Pumpkin Bread adapted from Allrecipes

1 (15 oz) can pumpkin puree
4 eggs
1 C vegetables oil (or 1/2 C and 1/2 C applesauce)
2/3 C water
2 cups white sugar
1 C light brown sugar
3 1/2 C all-purpose flour
2 tsp baking soda
1 1/2 tsp salt
1 tsp ground cinnamon
1 tsp ground nutmet
1/2 tsp ground cloves
1/4 tsp ground ginger

Directions:

1. Preheat oven to 350 degrees F.  Grease and flour three 7x3 inch loaf pans.  
2. In a large bowl, mix together pumpkin puree, eggs, oil, water and sugars until well blended.  In a separate bowl, whisk together the flour, baking soda, salt, cinnamon, nutmeg, cloves and ginger.  Stir the dry ingredients into the pumpkin mixture until just blended.  Pour into the prepared pans.
3. Bake for about 50-60 minutes in the preheated oven.  Loaves are done when toothpick inserted in center comes out clean.  

Friday, January 13, 2012

Cinnamon Coffee Cake

I made this to bring to a breakfast over the holidays and it was incredibly easy, perfectly moist, and had the amazing balance of cinnamon to cake.  I usually like to make things from scratch but couldn't resist when I saw that this literally was a "dump and stir" cake.  I think that the glaze added just that extra hint of sweet to top it off.  My husband is a big fan of coffee cake and was really hoping there'd be some left over for him to taste.  Luckily there was and he oohed and aahed over it.  I also loved that it was still moist even a couple of days after I had made it and the flavors just continued to meld together in such a yummy way.

Cinnamon Coffee Cake from Allrecipes

1 (18.25 oz) pkg yellow cake mix
1 (3.4oz) pkg instant vanilla pudding mix
1 (3.4oz) pkg instant butterscotch pudding mix
4 eggs
1 C water
1 C vegetable oil
1 C packed brown sugar
1 T ground cinnamon
1 C chopped walnuts (I omitted this)

Directions:
1. Preheat oven to 350 Degrees F.  Grease a 9x13 inch baking pan, or a 10 inch Bundt cake pan. 
2. In a medium bowl, stir together the cake mix, vanilla pudding mix, and butterscotch pudding mix.  Add the eggs, oil and water, mix until well blended.  In another bowl, stir together the brown sugar, cinnamon, and nuts.  Pour 1/3 of the batter into the pan, spread evenly.  Sprinkle with 1/3 of the nut/sugar mixture.  Repeat two more times (for three layers).  
3. Bake for 20 minutes in the preheated oven, then turn the oven down to 325 Degrees F and bake for an additional 350-40 minutes. 

Tips: I substituted the butterscotch for another vanilla pudding (as that's all I had) and it still turned out really well.

Friday, December 30, 2011

Maple Bars

I am so excited to blog about this dessert!  Not only because I haven't posted a dessert for awhile, but also because it is such a delicious throwback to my childhood.  My grandma used to make these bars all the time.  And then my own mom made them a lot when I was young.  Last week I gave a lesson in church about our heritage and wanted to share a recipe that was part of my family.  And so I made these to share.  They are so phenomenal!  Now don't be scared away by the idea of boiling raisins.  All it does it make the raisins soft--like melt-in-your-mouth soft.  There is also a very slight cinnamon hint that pairs perfectly with the combo of the moist raisins and chocolate chips in this bar.  And the maple glaze is very subtle and creates such a fantastic topping to this soft, comfort food!  And they're the perfect dessert in that they're sweet and addicting--but not too rich.  I could probably eat a whole pan of them myself if they were calorie-free. But you have my premission to pretend they are!

Maple Bars from Barbs

Boil for 10 minutes:
1 1/2 C raisins
2 C water
Cool mixture and then add 1 1/2 tsp soda

In a separate bowl; Cream together:
1 C butter
1 1/2 C sugar
Then add 2 eggs and mix well

In a separate bowl from above mixture, sift:
3 1/2 C flour
1 tsp baking powder
1 tsp cinnamon
3/4 tsp salt
Then add dry mixture to creamed mixture. Add raisins.  Add 1 c chocolate chips.

Spread into two greased 9x13 pans.  Bake at 350 for 20 minutes or when center comes out clean with a toothpick. Watch them closely at the end as they can overbake quickly.

Maple Glaze
1/4 C butter
1 C brown sugar
4 T water
Bring mixture to a boil.  Remove and cool.  Add enough powdered sugar to make a glaze (I did about 1/3 to 1/2 cup).  Spread on bars while still quite warm.  Cut when cool.

Tuesday, December 20, 2011

Christmas Dinner

Wondering what to make on Christmas Eve or Christmas day?  I've compiled a list of a few of our very favorites--many that I'll be making this weekend as well.  I love the holidays and love getting in the kitchen and making our traditional meals and treats.  We always do ham on Christmas Eve and our favorite breakfast casserole on Christmas morning.  We also make sugar cookies to leave out for Santa with a big glass of milk.  So here are some of our tried and true holiday favorites.  Merry Christmas!
(Just click on the recipe names and it will take you right to the recipe)

SIDES

BREADS
Cinnamon Rolls (Christmas morning tradition)

SALADS

APPETIZER/DRINK/SNACK 

 DESSERT
Not Pictured (but I just had to add them):


Friday, September 30, 2011

Candy Chex Mix

This is the most sinfully delicious snack EVER! My hubby has been craving this one for a few months and so since we're having some friends over to play games tonight, I thought I'd make this one to share. Otherwise, we'll eat the whole thing ourselves this weekend and then I'll feel unjustified in complaining about these last 15 pounds that need to come off. It's so chewy and soft and has enough of that sticky goodness. A good friend of ours made this for a road trip while we were dating and we begged him for his mom's coveted recipe and so here it is:
Candy Chex Mix
1 C. granulated sugar
1 C. light corn syrup
1 1/2 cubes butter
1 tsp vanilla
Stir and boil first three ingredients until dissolved. Add the vanilla. Mix together 1 large box of Crispix, 1/4-1/2 box of Corn or Rice chex in a big bowl. Add desired nuts (you could add anything you like...peanuts, M&Ms, raisins, etc...we just like cereal and coconut) and coconut. Mix with sauce. And try to stop yourself from eating more than a dozen handfuls!
I usually add about 1/2 package of coconut. My hubby isn't a huge coconut fan and he still loves it in this--it gives it more of that ooey gooey softness with the slight crunch of the cereal.

Sunday, May 1, 2011

Chewy Oatmeal Chocolate Chip Cookies

This amazing, chewy, addicting cookie is going to be my new "go to" cookie.  We were going on a vacation last week and so I went on the search for a new, delicious cookie to take on the road with us.  Oh my.  These are insanely good. Melanie at My Kitchen Cafe claimed that they were her favorite cookie EVER.  What an endorsement!  And I must say that I agree with her.  My husband kept talking all weekend about how amazing they were. The coconut and abundance of brown sugar make for one moist, perfectly chewy combination.  I froze a ziploc bag of them to take with us and they were even better frozen, in my opinion.  I hate how cookies are sometimes only good for a day before they start to taste old.  Well, this recipe was not that way at all!  We had a tupperware of them sitting out for a good three days and they almost tasted better as the days wore on.  This is quite a feat, in my opinion.  I was so grateful we doubled the batch because we all gobbled them up and were so sad when they were gone.  I will definitely be making these again and again!

Oatmeal Chocolate Chip Cookies with Coconut from My Kitchen Cafe

1 cup oatmeal (not quick)
2 1/4 cup flour
1 teaspoon baking soda
1 teaspoon salt
1 cup butter, room temperature
1 1/4 cup light brown sugar
1/2 cup dark brown sugar
2 large eggs
1 tablespoons vanilla
1 cup coconut
12 oz. semisweet chocolate chips

Preheat oven to 350 degrees. Put the top 4 ingredients into a food processor or blender and blend about 30 seconds until coarse. Set aside. In a large bowl, beat the butter for 30 seconds until light in color. Add the sugar, eggs, and vanilla. Next, add the dry ingredients then add the coconut and chocolate chips. Shape cookie dough into balls and place on cookie sheet. Bake for 12-13 minutes. Let the cookies cool slightly before removing them from the pan to a wire rack. Makes about 2 dozen cookies.

Tips:  I didn't have any dark brown sugar--so we just used light brown in it's place.  I'll let you know if the texture or taste is different once I make it again with the dark brown.  But they were pretty amazing when we made it!  Also, we doubled it and didn't want to use 4 cubes of butter--so replaced 1 cube with 1/2 cup of unsweetened applesauce and it was still great!

Friday, April 15, 2011

Moist Orange Carrot Cake

This fabulously moist and delicious cake was brought to us after I had my baby a few months ago.  We were graciously brought a meal by a woman from our church and she followed it with this cake.  My husband was actually out of town and she brought us a large plate with a few slices.  By the time he got home the cake had been devoured.....by me.  I'd like to say that my kids were the culprits but I just could not contain myself.  For months I couldn't eat sweets without getting sick or having outrageous heartburn while being pregnant and so I majorly indulged on this sweet dessert.  I could not believe how incredibly moist and flavorful it was.  I also thought I detected the texture of coconut in it--and I loved it. 

So I ran into the woman who had brought us the cake last week and shamelessly asked if she'd share the recipe with me.  I was so surprised when she said that the secret ingredient to it's moistness is the can of mandarin oranges in it.  I never would've guessed that as I really didn't detect orange in it.  I just thought it was a straight-up carrot cake.  And a REALLY moist, awesome one at that. I knew I had to get this recipe so that I could make it again.  And share it. 

Orange Carrot Cake from Carol Hallen

3 C flour
2 C sugar
1 C coconut
2 1/2 tsp. baking soda
2 1/2 tsp. cinnamon
2 C grated carrots (4 carrots)
1 1/4 C oil
1 tsp. salt
2 tsp. vanilla
1 tsp. grated orange peel
1 (11 oz) mandarin oranges & juice
3 eggs

Blend all dry ingredients together.  Add the liquid ingredients and mix for about 2 minutes.  Pour into a greased 9x13 pan and bake for 40-45 minutes at 350 F or until a toothpick comes out clean.  Cool and frost with cream cheese frosting. 

Cream Cheese Frosting

8 oz cream cheese, softened
2 T. melted margarine or butter
1 tsp. vanilla
3 C powdered sugar
1/2-1 C nuts, if desired

Beat well and frost cake.  Refrigerate. 

Saturday, October 30, 2010

Sugar Cookies

Happy Halloween!  I thought I'd post the MOST FANTASTIC recipe for sugar cookies ever!  How's that for an endorsement.  This is the recipe that my mom (aka Barbs in previous posts) has been making since I was a little girl.  The cookies are really light and soft and are honestly the best recipe I've made.

So I have kind of a funny story about this recipe.  I had posted previously about another sugar cookie recipe that I claimed was my mom's tried and true recipe.  Well, we were living across the country from my mom at the time and I was making them for years thinking it was her recipe.  And then when we were in town my mom made some sugar cookies and I remember thinking that they tasted much, much better and flakier and softer than mine.  I had even thought when making them previously that I could never get it quite like she did when I made mine.  And then my sister-in-law had gotten that recipe off of my blog and called my mom asking if you really used that much flour.  To which my mom responded that you for sure did not use that much flour.  So my mom went searching through her recipes and found that I had copied down a recipe in her box that she hadn't made in 25 years and I had copied it thinking it was the one she used.  So while that other recipe I have on here is good--this one is SOOOOO much better and is the one you should try!  It's the only one I'll be using from now on! 

Barbs Sugar Cookies

3/4 C butter
1 C sugar
2 eggs
1/2 t. vanilla
2 1/2 C flour
1 t. baking powder
1/2 t. salt

Cream butter and sugar until fluffy.  Beat in eggs and flavoring.  Sift together dry ingredients and blend into creamed mixture.  Chill at least 1 hour.  Roll out 1/8 inch think.  Bake at 400 degrees F for 6-8 minutes.   Makes 2 dozen.

Tip: I always pull them out at no longer than 8 minutes--even if they look a little undone.  Then I leave them on the cookie sheet for a few minutes and they are firm but so soft and light.  I also add about 2-3 tsp of almond extract to my frosting (like my mom does) and it is the secret ingredient that makes them amazing!


Friday, September 24, 2010

Laurie & Amy's Amazing Chocolate Cake

I was going through old pictures on my computer today and ran across this cake and couldn't believe that I had not posted this recipe yet!  It is truly one amazing chocolate cake--just as the name states.  My mother-in-law is a chocoholic and loves all things chocolate.  So I went in pursuit of a chocolate cake worthy of her for her birthday last year.  I couldn't pass up trying this cake after the rave review it got from A Bountiful Kitchen.  We were not disappointed in the least.  My cute mother-in-law is still talking about it!  She declared it one of the best she's ever had and had to have the recipe.  She even took it to share with her siblings when they celebrated her birthday and said that they were all dying over it.  It is very dense and moist and chocolatey!  I know that it you are also a chocoholic that you will love this recipe, too.

Laurie and Amy's Amazing Chocolate Cake from A Bountiful Kitchen


1 3/4 cups boiling water
6 oz. semisweet chocolate, coarsely chopped, OR chocolate chips (for a double recipe, use 15 oz. chocolate chips, which equals 2 1/2 cups.)
1 cup unsweetened cocoa powder*
2 cups flour
2 tsp. baking soda
1/4 tsp. salt
10 oz (2 1/2 sticks) butter, softened
1 3/4 cups packed dark brown sugar
4 large eggs
2 tsp. vanilla

Preheat oven to 350 degrees. Line two 9-inch round cake pans with circles of wax paper or baking parchment.

Pour the boiling water over the chocolate chips. Add cocoa and stir until mixture is smooth. Set aside to cool. Cream the butter and brown sugar. Add the eggs one at a time, beating well after each. Beat in vanilla. Add the dry ingredients and half of the chocolate mixture. Beat on low to combine, then on high for 1 1/2 minutes. Add the remaining chocolate mixture and beat on low until mixed.

Pour batter into pans and bake 30-40 minutes, or until a cake tester inserted into the middle comes out completely clean. Cool for 10-15 minutes; remove from pans. Wrap in double layers of plastic wrap while still warm and freeze. Double recipe makes two 10" layers plus two 8" layers or four 9" layers. Never fill pans more than 2/3 full.

Frosting:

1 1/4 cups plus 2 T. butter, softened
4 1/2 cups powdered sugar
1 cup unsweetened cocoa powder (For really dark frosting, use part Hershey's Special Dark Cocoa, about 4 T.)
2 tsp. vanilla
1/4 cup plus 2 T. Milk

Cream butter with electric mixer. Whisk together sugar and cocoa. Beat one-third of the sugar/cocoa mixture into the butter. Mix in vanilla. Add the rest of the sugar/cocoa mixture alternately with milk and beat until frosting is smooth.

When cake is frozen solid, frost between the two layers and spread a thin layer over the whole cake. Freeze again for about 20 minutes. Frost again. Repeat if desired. (Frost the last time on the day you plan to serve the cake and let it stand at room temperature to thaw.)

Tuesday, September 21, 2010

Gingersnaps

As I've mentioned in a previous post, when I was younger I used to babysit for a phenomenal baker.  I would watch her kids every Monday after school and she would always have some yummy treat sitting on the counter.  My two favorites were her chocolate chip cookies and these phenomenal gingersnaps.  One day she had just made a fresh batch of these amazing cookies and left the recipe sitting out and so I immediately grabbed a pen and paper and wrote it down.  I was probably only fourteen at the time--so I hope I wasn't stealing a secret family recipe or anything like that.  I'm sure I mentioned to her that I copied it (I hope).  But these really do have the perfect flavor and blend of spices in them.  They have the most amazing, addictive pairing of sweet and savory--which makes it very, very easy to eat a dozen in one sitting (not that I'd ever do that....).  I made these last week and my husband and kids raved about them.  My husband usually loves chocolate sweets more than something like this so I was really surprised by how much he LOVED them.  I also love their texture--just the right amount of chewiness and slight crunch.

Gingersnaps from Michelle S.

* Cream: 1 C granulated sugar & 3/4 C butter

*Add: 1 egg and 1/4 C molasses

*Then add:
2 C. flour
2 tsp baking soda
1 tsp cloves
1/4 tsp salt
1 tsp cinnamon
1 tsp ginger

Roll into small balls.  Roll balls in sugar.  Bake on a lightly greased cookie sheet at 350 degrees for 8-10 minutes.  Enjoy!!!

Wednesday, May 26, 2010

Pumpkin Cake

I am a huge fan of pumpkin!  When I was in college we would make frequent visits to Great Harvest (a bread store) on Tuesdays to get free samples of their pumpkin bread.  I know, I know....a very cheap, college student kind of thing to do.  I've tried to make it up by actually buying a loaf or two when I go there now.  When I started dating my husband I made him go in there with me one night and he was embarrassed by the whole ordeal.  I thought poor college students had no shame--but apparently he did and so we laughed about it and I stopped mooching their yummy pumpkin bread after that.

So this cake does a fantastic job of fulfilling my pumpkin love.  It is really, really moist and pares perfectly with the cream cheese frosting.  Which, I must add, I am not usually a big fan of.  But I love the frosting with this particular cake.  I also love that you make it on a 10x15 pan and so it goes great when you're taking dessert to a crowd.  Try it...I think you'll like it even if you don't love pumpkin as much as I do. This was the cake that I even made for my daughter's first birthday many years ago.

Pumpkin Cake from Barbs (aka my mom)

2 C flour
1 tsp soda
2 tsp baking powder
1/2 tsp salt
2 C granulated sugar
4 eggs, well beaten
2 C pumpkin
2 tsp cinnamon
1 tsp vanilla
1 C vegetable oil

Beat eggs; add pumpkin, cinnamon, oil, and vanilla.  Mix well.  Add rest of dry ingredients. Grease a 10x15 inch pan.  Pour batter into pan.  Bake at 350 for 20-25 minutes.  Spread on frosting after cooled.

Frosting:
8 oz cream cheese
1/2 C butter
1 tsp vanilla
2 C powdered sugar

Combine and mix until well blended.

Sunday, April 11, 2010

Rocky Mountain Cookies

It has clearly been way too long (once again) since I have posted.  The good news is that we have officially sold our house!!! Hallelujah.  It has been a long fourteen months but we are just so thankful to finally have it off our hands.  I didn't want to post anything about it being in contract so I didn't jinx it. But we signed a couple of weeks ago and so it's all official. 

So to celebrate our move back to the Rocky Mountains--I wanted to share this recipe.  The secret in this recipe that makes then unique and that gives them that extra little crunch is the rice crispies in them.  It is a really delicious variation on the standard chocolate chip cookie.  My friend brought the batter for these cookies to a dinner we were having when we were first living in Ohio.  She baked the cookies while we were eating dinner and we all inhaled them before she had even scooped out another batch to bake.  They are soft from brown sugar and oats with the perfect amount of crunchy.

Rocky Mountain Cookies from "The Essential Mormon Cookbook"

1 C sugar
1 C packed brown sugar
1 C butter or margarine, softened
2 eggs
1 tsp vanilla
2 C flour
1 tsp baking soda
1/4 tsp salt
1/2 tsp baking powder
2 C old-fashioned oats
2 C Rice Crispies cereal
1 (12 oz) bag chocolate chips

In a large bowl cream together sugars and butter.  Add eggs and vanilla and beat well.  Sift dry ingredients into a separate bowl.  Add to mixture.  Fold in oats, cereal, and chocolate chips.  Drop by tablespoons onto a greased baking sheet.  Bake at 350 degrees for 10-12 minutes or until very lightly browned.  Makes 6 dozen.

Sunday, February 28, 2010

Snickerdoodles

 Sometimes I just crave a simple, no fluff cookie.  The snickerdoodle fits that description, without a doubt.  But, oh how I love this simple cookie.  I went out to lunch this week with my mom, sister, and sweet grandma and afterwards we went to get a cookie at a delicious cookie shop here.  My little guy got a snickerdoodle there and I stole a bite of it.   After wetting my appetite with that tiny bite (I tried to steal another one and he broke me off an atom-sized one....um, thanks?) I knew that I needed to bake some of my own this weekend.  I went on a search and found a highly rated recipe that did not disappoint in ANY WAY.  The cookies were soft with just the right amount of slight crunch on the outside. 
They key to a good snickerdoodle it to take them out of the oven at the right time (7-8 minutes for this recipes...no longer) even if they don't quite look done.  They set up quite a bit after removing them from the oven.  Otherwise, they'll be too crunchy and overdone.  Which is not good...in my opinion. 
This recipe is also a perfect one to bake with little kiddos.  They loved helping me roll the dough in the cinnamon/sugar mixture. 
Mrs. Sigg's Snickerdoodles from Allrecipes.com

1 C butter, softened
1 1/2 C white sugar
2 eggs
2 tsp vanilla extract
2 3/4 C all-purpose flour
2 tsp cream of tartar (can use 4 t vinegar or 4 t lemon juice)
1 tsp baking soda
1/4 tsp salt

2 T white sugar
2 tsp ground cinnamon

1. Preheat oven to 400 degrees F.

2. Cream together butter, sugar, eggs, and vanilla.  Blend in the flour, cream of tartar, soda, and salt.  Shape dough by rounded spoonfuls into balls.
3. Mix the 2 T sugar (I used 3 T) and the 2 tsp cinnamon (I used 3 tsp).  Roll balls of dough in mixture.  Place 2 inches apart on ungreased baking sheets.
4.  Bake 7-8 minutes (not a minute more).  Remove immediately from baking sheets. Yields about 48 cookies.

Tuesday, November 3, 2009

Train Birthday Cake


My little guy celebrated his 3rd birthday last week! He is totally obsessed with GeoTrax and really, really wanted a train cake. I tried to persuade him towards an easier cake to make...but he wouldn't be swayed.  So I went on the hunt for a fun and challenging cake.  I wanted to try something new just to see if I could do it.  We're huge fans of Food Network Challenge, where they make all sorts of amazing cakes.  That being said, don't look too closely at my cake as I am no Ace of Cakes by any stretch of the imagination!  But all the time spent making it (at least five hours to put it together....what was I thinking?) was totally worth it because he LOVED it and has been talking about it for days.

I found a recipe for vanilla cake on allrecipes and used that to make the engine--but it was not a great recipe at all for making this kind of cake.  It didn't come out of the pan well and upon cooling, the edges curled and so when I put the engine together the smoke stacks were pulling away from each other.  So I had to use a lot of frosting to fix that.  I realized this pretty early on and so I looked for a different recipe to use for the cars.  This second recipe was perfect!  It was moist and delicious to eat but also dense enough to cut and make cars out of.

Vanilla Buttermilk Cake from phe/MOM/enon (see blog for original source)

4 whole large eggs
2 egg yolks
2 tsp of vanilla extract
1 1/4 C buttermilk
3 C cake flour
2 C sugar
4 1/2 tsp baking powder
1/2 tsp salt
8 oz butter, room temperature

Preheat the oven to 350F degrees.  Butter the bottom and sides of three 8-inch cake pans.  Line with parchment paper and grease the paper.

Place the eggs and the yolks in a medium bowl.  Add the vanilla and 1/4 C of buttermilk and whisk all the ingredient together.  Set aside.

Combine the flour, sugar, baking powder, and salt in the bowl of a mixer; whisk to blend.  Add the remaining buttermilk and butter to the dry ingredients and with the mixer on low speed, blend together.  Raise the mixer to medium speed and beat until light and fluffy; 2 minutes.

Add the egg mixture in three additions, scraping down the sides of the bowl after each addition.  Divide the batter among the pans.

Bake the cake layers for 28-32 minutes or until a toothpick inserted in the center comes out clean.  Let the cake layers cool in the pan for 10 minutes.  Turn out the cakes onto a wire rack and remove the paper from the bottoms. Cool completely.


I wish I could say that I thought up this whole cake idea on my own.  No...I'm just good at copying.  I found my inspiration from coolest-birthday-cakes.com. So I put together some different ideas that were shared on that site to come up with this cake.  The train tracks were made from the Keebler chocolated covered wafer cookies, chocolate licorice, and smashed graham crackers put in between the tracks to look like dirt. 


I used the Wilton 3D train engine pan to make the engine.  I then baked two loaf-sized cakes to make the cars.  Here is the buttercream frosting recipe I used:

Buttercream Frosting

1 C unsalted butter
2 T vanilla extract
2 T milk
4 C powdered sugar

This frosting was the perfect consistency for piping.  I then just colored the frostings as I went along (the biggest time sucker).

I used pretzels to make the bear cage.  I frosted a piece of cardboard cut out to be the same size as the car for the roof of the cage.  I just put the pretzels in the cake and then piped frosting on top of each pretzel and then applied the cardboard roof.  I let the roof sit for a bit and so the frosting on it was already hardening.


The wheels are made out of oreos.  After the cake was all complete, I frosted the board where I wanted my "dirt" to be and then poured it on and pressed it into the frosting a bit.

And finally, the light on the front of the engine is an orea with one side of the cookie removed.

Thursday, October 22, 2009

Pumpkin Blondies


We were able to get away and go to a cabin as a family this last weekend.  My little brother is moving to North Carolina tomorrow with his wife and brand new baby :(.  So it was our last hoorah before they move.  My uncle has this fabulous cabin where we just relaxed, played games, talked, read books, and ATE lots of good food.

I brought along this recipe to share while we were all together.  I guess it attests to how good they are when we made a trip into the teensy little town nearby to buy more white chocolate chips to make these AGAIN.  We seriously polished off the pan before they had even cooled!  The second pan of blondies had a small sliver that survived to the following morning and we all decided that they were even MORE delicious the second day.  In fact, I'd recommend following the directions (we were just too enticed by their scent while baking) and letting them cool completely before slicing into them.  They were so, so, so delicious!  The white chocolate pairs perfectly with the pumpkin and I'm sure you'll be wanting to make a second batch after you make them, too.

Pumpkin Blondies from Dinner & Dessert (see blog for original source)

2 cups all-purpose flour (spooned and leveled)
1 tablespoon pumpkin-pie spice
1 teaspoon baking soda
3/4 teaspoon salt
1 cup (2 sticks) unsalted butter, room temperature
1 1/4 cups sugar
1 large egg
2 teaspoons vanilla extract
1 cup canned pumpkin puree
1 package (12 ounces) white chocolate chips

Preheat oven to 350 degrees.  Line bottom and sides of a 9-by-13-inch baking pan with foil, leaving an overhang on all sides. In a medium bowl, whisk together flour, pie spice, baking soda, and salt; set aside. With an electric mixer, cream butter and sugar on medium-high speed until smooth; beat in egg and vanilla until combined. Beat in pumpkin puree (mixture may appear curdled).  Reduce speed to low, and mix in dry ingredients until just combined. Fold in chocolate chips.

Spread batter evenly in prepared pan. Bake until edges begin to pull away from sides of pan and a toothpick inserted in center comes out with just a few moist crumbs attached, 30 to 40 minutes. Cool completely in pan.

Lift cake from pan (using foil as an aid). Peel off foil, and use a serrated knife to cut into squares.

Tips: I used unsalted butter for the first batch because I had brought it.  However, I only had salted butter for the second batch. I reduced the salt to about 1/4 tsp and we all agreed that there was no difference between the two.

Monday, October 5, 2009

Apple Spice Bars


I have been eyeing these bars over at Dinner & Dessert and waiting for a chance to try them. I was not disappointed! I love fall with all of its pumpkin and apple-filled desserts. These reminded me of the cinnamon blondie at Sugardaddy's. Have you heard of Sugardaddy's? If not, to be compared to their blondie is a huge compliment. Sugardaddy's was one of our favorite places to get blondies and to take visitors to see while we were living in Ohio. They were featured on Throwdown with Bobby Flay and also on Ellen (among other things) and have the cutest packaging. Their owners are passionate and so we would often take visitors just to hear them explain their desserts. But I digress...these bars reminded me of home and were a close match to the flavors from one of my favorite fall treats. They are delicious served with ice cream, too. They were soft and perfectly balanced between the apples, brown sugar, and spices.

Apple Spices Bars from Dinner & Dessert (see her blog to see original source)

Ingredients:
2 c. plus 2 Tbsp all purpose flour
2 tsp baking powder
1/4 tsp salt
2 tsp ground cinnamon
1/8 tsp nutmeg
1/8 tsp allspice
small pinch ground cloves
1/2 c. butter, melted
1 c. packed brown sugar
1 c. white sugar
2 eggs
1 Tbsp vanilla extract
2 apples, cored and diced (a little less than 2 c.)
cinnamon sugar for sprinkling

Directions:
-Preheat oven to 350 degrees and line 9×13 pan with foil and baking spray.
-In medium bowl, combine flour, baking powder, salt, cinnamon, nutmeg, allspice, and cloves.
-Whisk to combine well and set aside.
-In bowl of stand mixer, combine sugars and butter and beat on medium high until light and fluffy, about 1 minute.
-Add eggs, one at a time, beating well to combine.
-Add vanilla extract and beat to combine.
-Turn mixer on slow and fold in flour mixture a little at a time until just combined.
-Fold in apples.
-Spread mixture evenly into prepared pan and sprinkle top generously with cinnamon sugar.
-Place in oven and bake until cooked through, when top slightly bounces back to the touch, about 30 minutes.
-Remove from oven and let cool completely before removing from pan, cutting and serving. (bars will be very soft)

Tips: I'm still adjusting to my oven since moving (I think it's not quite hot enough). I let them bake for about 33 minutes and then removed them. They were SO delicious--but slightly gooey in the middle on the second day. So I think I'll bake mine for about 40 minutes next time. But, as I said, it could just be my oven.